We'll start by creating a basic HTML page. The example is simple enough that we don't need a complex file structure and everything will be done from one file. You can use a basic boilerplate HTML for the start: https://htmlboilerplates.com/
We need to trigger our chain of events, so add a button to serve as a trigger:
<body>
    <button role="button" id="initTrigger">START!</button>
</body>
We'll need to prepare some sections in the document to help us structure the content we'll be adding once we get it from the APIs, so let's add 2 sections. The rest of the work we'll do with JavaScript, so we'll add a script element into our document and start writing the rest of the content inside it.
<body>
    <button role="button" id="initTrigger">START!</button>
    <section id="cocktailSection"></section>
    <section id="NASAimage"></section>
    <script> </script>
</body>
You might have guessed from the section IDs that the first API we'll use is a CocktailDB API - a repository of recepies for alcoholic and non-alcoholic drinks. The sesond one will be one of APIs hosted by NASA called Astronomy Picture of The Day, or APOD
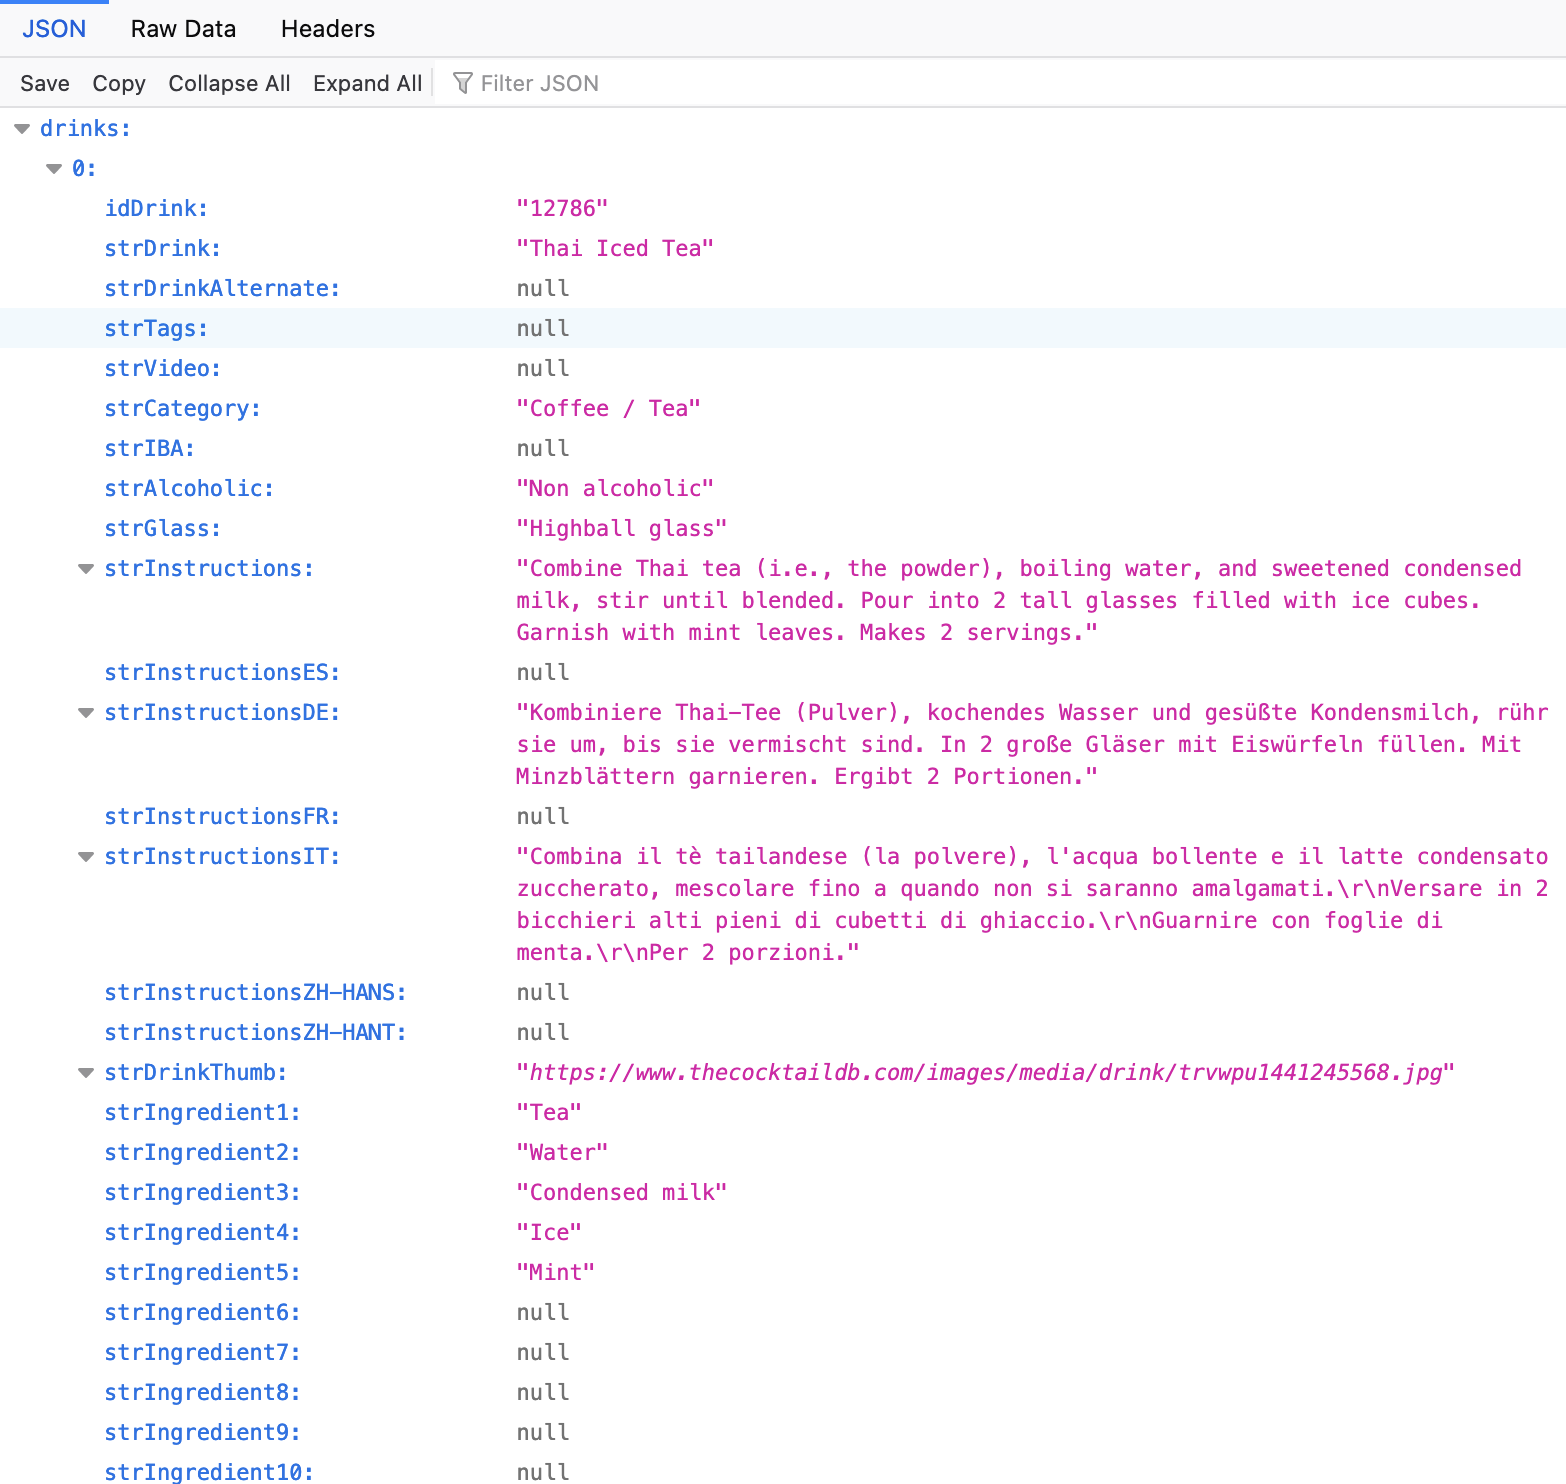
They have their diffirences, but the main similarity is that they both are easy to acces and return their results in JSON. JSON is a data format - in fact, it's the most common data format on the Web (at least in 2023.) You can see what it looks like if you copy one of the example URLs from Cocktail DB - let's say this one: www.thecocktaildb.com/api/json/v1/1/random.php and open it in a new tab in your browser.
If you are using Firefox you will probably see something like the image below.
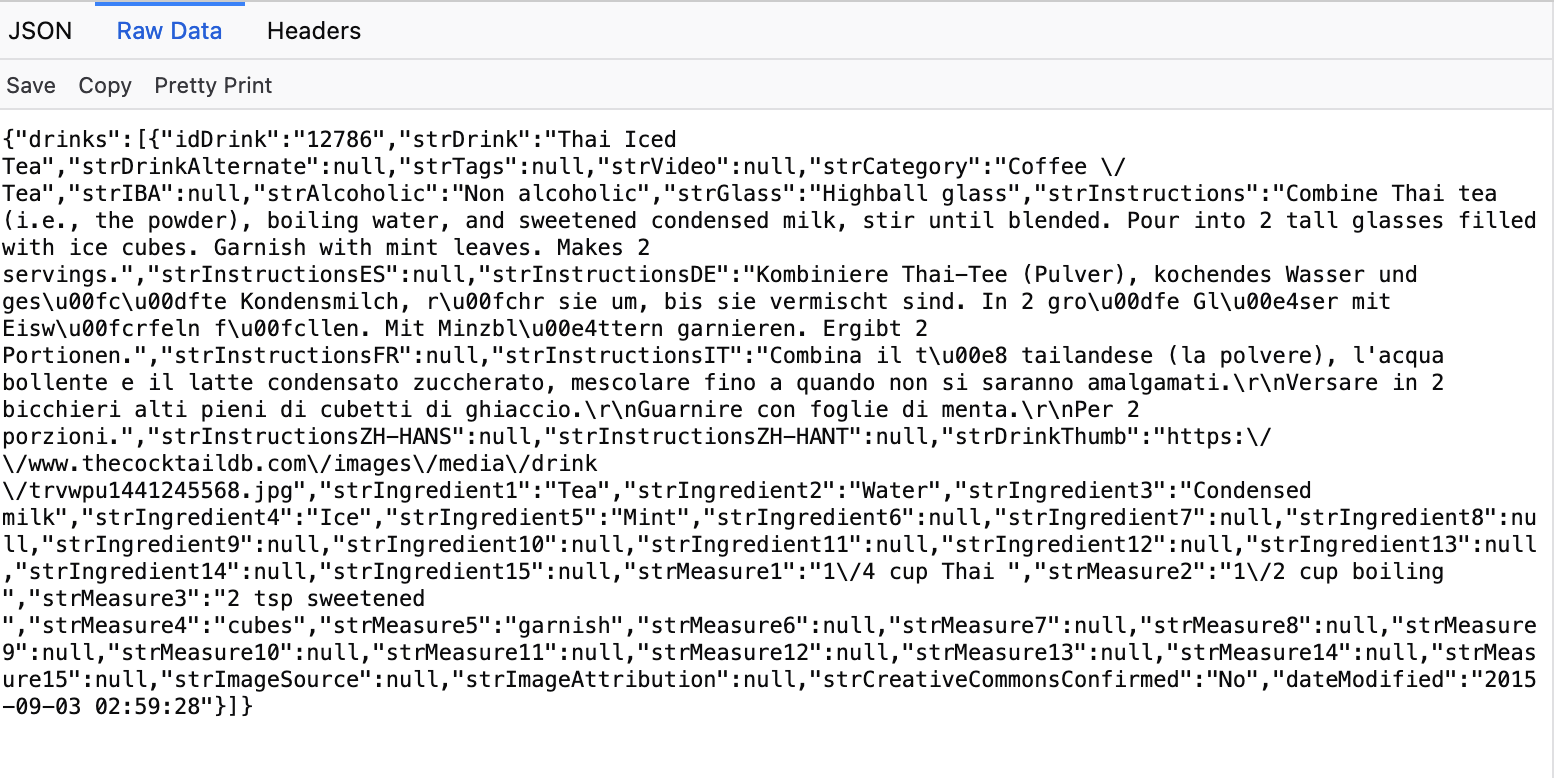
In Chrome, without a built-in JSON formatting tool it will probably look different (see below). You can get a JSON prettifier or just switch to Firefox!
Now that we know what kind of data we can expect in return to our requests, and how to get them manually we can write a script to fetch those results for us. We'll move into our <script> and write some JavaScript to do that. First we'll need to create a reference to our button, so that we can track when it's clicked.
const triggerButton = document.getElementById('initTrigger')
Then we'll need to create an event listenter on that button, so that when the event we're looking for (a click on the button) happens - we'll trigger a function in response. The function we'll be triggering doesn't exist yet, but we'll create it afterwards add call it "fetchCocktailData"
triggerButton.addEventListener("click", fetchCocktailData)
Now we can make the function. We'll be using JavaScript Fetch API to make our requests to the servers. The main reason why we need to use it is because we don't know how much time the server we'll take to respond to us with the data we're looking for. We'll need to hold the execution of dependent functionality until we get the data and Fetch API will help us.
We'll fetch the data from a URL, then extract just the JSON payload, sans the headers and other metadata, and then we'll log the result into the browser concole to verify. The URL we'll is the same random cocktail URL and we'll store it in a constant for convenience. Here is what the contents of our <script> should look like now
const triggerButton = document.getElementById('initTrigger')

const randomCocktailURL = "https://www.thecocktaildb.com/api/json/v1/1/random.php"

const fetchCocktailData = () => {
    fetch(randomCocktailURL)
        .then((response) =>  response.json() )
        .then((payload) => console.log(payload))
}

triggerButton.addEventListener("click", fetchCocktailData)
If you launch your HTML file in a browser, open the console and click the "Start" button you should see a JSON payload very similar to what you saw whe you launched the URL in a browser tab.
Now that we have access to the data through our script we can add a function to parse the data and add it to our page instead of just logging it into the console. The data that comes in JSON format would consist of objects where data is stored in key-value pairs and arrays where data is stored under indices. To access data in an object we'll use object.key format and for the array we'll use array[index] format. To find which should be used we'll need to look closely at the structure of the data received - that's why logging it into the console is useful.
const appendCocktailData = (data) => {
    console.log(data)

    const firstDrink = data.drinks[0]
    const drinkName = firstDrink.strDrink
    const drinkImg = firstDrink.strDrinkThumb
}
To append the data we'll need to first create an element in the document, then add our data to its properties as required, and then append it to the apropriate section in the document. For that we'll also need to add the reference to that section - we can place it at the top of our script next to the reference to the button.
const triggerButton = document.getElementById('initTrigger')
const cocktailSection = document.getElementById('cocktailSection')
The function 'appendCocktailData' should now look like this:
const appendCocktailData = (data) => {
    console.log(data)

    const firstDrink = data.drinks[0]
    const drinkName = firstDrink.strDrink
    const drinkImg = firstDrink.strDrinkThumb

    const nameHeader = document.createElement('h3')
    nameHeader.innerText = "We had " + drinkName
    cocktailSection.appendChild(nameHeader)

    const image = document.createElement('img')
    image.src = drinkImg
    image.alt = "image of " + drinkName
    cocktailSection.appendChild(image)
}
We can now call this function once our data is fetched and parsed. The script should now look like this:
const triggerButton = document.getElementById('initTrigger')
const cocktailSection = document.getElementById('cocktailSection')

const fetchCocktailData = () => {
    fetch(randomCocktailURL)
        .then((response) =>  response.json() )
        .then((payload) => appendCocktailData(payload))

}

const appendCocktailData = (data) => {
    console.log(data)

    const firstDrink = data.drinks[0]
    const drinkName = firstDrink.strDrink
    const drinkImg = firstDrink.strDrinkThumb

    const nameHeader = document.createElement('h3')
    nameHeader.innerText = "We had " + drinkName
    cocktailSection.appendChild(nameHeader)

    const image = document.createElement('img')
    image.src = drinkImg
    image.alt = "image of " + drinkName
    cocktailSection.appendChild(image)
}

triggerButton.addEventListener("click", fetchCocktailData)
Time to add the next link in our Rube Goldberg machine - a call to another API, this time NASA APOD. While CocktailDB API does not require any user accounts or other forms authentication, NASA encourages their API users to obtain their own authentication key. Doing so will expand the functinoality and does not cost anything, so it's not a bad idea. Go to https://api.nasa.gov/#signUp and use your email to create your own key.
Then we need to figure our which URL to send our requests to to get the data we're looking for. If you open the details of APOD API you will see that all requests should go to the same URL - https://api.nasa.gov/planetary/apod but there is a set of query parameters that can be apended to the URL to modify your request. Those parameters include api_key, date, count and others. To add those parameters to the query we need to first add a ? after the URL and then separate each query parameter by an &. For example:
https://api.nasa.gov/planetary/apod?api_key=YOUR_OWN_API_KEY&date=2003-10-29
Some of these parameters might change so it helps to separate them in our code. We'll re-assemble them later when it's time to use them, but for now let's create a set of 3 constants: for the URL and for each of the query parameters, and pust if next to our cocktailDB URL constant:
const nasaAPODurl = "https://api.nasa.gov/planetary/apod"
const nasaAPIkey = "api_key=YOUR_OWN_API_KEY"
const nasaDate = "date=2003-10-29"
The date of October 29, 2003 is completely random, feel free to put any other one you like.
Now we can create a fetch function for the NASA API and we'll trigger it right after we're done appending the content from the CocktailDB. At the end of appendCocktailData add the call to fetchNASAData:
    // other previous code here
    const image = document.createElement('img')
    image.src = drinkImg
    image.alt = "image of " + drinkName
    cocktailSection.appendChild(image)
    // ADD THIS LINE:
    fetchNASAData()
}
You could also create a version where you extract a piece of data from one API response and use it as a parameter for the next call. For example, we could take the date on on which the cocktail recepie was last modified and use it instead of our random date in the call to the NASA API. For that we'll need to make sure that the date also fits the format that the NASA API expects - you will typicaly find what it is in the API documentation. Comparing the data we can see that the cocktail `dateModified` contains hours, minutes and seconds, while the NASA API expects just a year, month and day separated by dashes. one easy way to work around that is to convert `dateModified` into a JavaScript Date object and then extract the year, month and day and re-assemble them via one of the string concatention methods. Notice that `fetchNASAData` function now takes an agrument and we're passing the formatted date to it.
    cocktailSection.appendChild(image)

    const a = new Date(firstDrink.dateModified)
    const dateForNASAAPI = a.getUTCFullYear().toString()+"-"+(a.getUTCMonth()+1).toString()+"-"+a.getUTCDay()

    fetchNASAData(dateForNASAAPI)
}
Now lets create the fetchNASAData function. I put it right below the appendCocktailData function in the example but you are welcome to organize your code as you prefer. The functionality is veryb similar to how we fetched the data from CocktailDB, the only thing we need to do first is to assemble the URL and the query parameters to get the right response.
const fetchNASAData = () => {
    const fetchURL = nasaAPODurl+"?"+nasaAPIkey+"&"+nasaDate
    fetch(fetchURL)
        .then((payload) =>  payload.json() )
        .then((json) => appendNASAData(json))
}
Or if you wanted to use a date supplied by another API response, you could pass the date as an argument to the function and then use that instead of pre-set constant `nasaDate`.
const fetchNASAData = (picDate) => {
    const fetchURL = nasaAPODurl+"?"+nasaAPIkey+"&"+"date="+picDate
    fetch(fetchURL)
        .then((payload) =>  payload.json() )
        .then((json) => appendNASAData(json))
}
At the end of the fetching sequence, in the last "then" you will notice a call to a new function - appendNASAData. We have not made it yet, but from the previous example you might have guessed what it does. Let write it out.
Similar to CocktailDB we need to parse the data to extract just the components we need. Unfortunately, very API structures its responses differently, so we'll need to look at the data structure to figure out how to get to the specific values - remember that in an object we'll use object.key format and for the array we'll use array[index] format. Remember to console.log the data to see how it's structured.
After that we can create our document elements and put the data into their apropriate properties. Then we can append them to the section of our docuemnt allocated for NASA data - don't forget to include the reference for it at the top, ner the references to the button and the cocktail section:
const triggerButton = document.getElementById('initTrigger')
const cocktailSection = document.getElementById('cocktailSection')
//NEW ONE:
const NASAsection = document.getElementById('NASAimage')
The whole appendNASAData function would look like this:
const appendNASAData = (data) => {
    console.log(data)

    const picTitle = data.title
    const imgURL = data.url

    const picHeader = document.createElement('h3')
    picHeader.innerText = picTitle
    NASAsection.appendChild(picHeader)

    const nasaImg = document.createElement('img')
    nasaImg.src = imgURL
    nasaImg.alt = "the image of " + picTitle
    NASAsection.appendChild(nasaImg)
}
This concludes the first example. You can continue adding for fecth*** and append*** function to this chain of events, and add additional content to construct a story around the data you are receiving. You can also use some data comonents of a previous response - like title or description - to server as query paremeters in the following fetch data requests.
You can see the entire example code here and try in in action here.